
Quick Answer
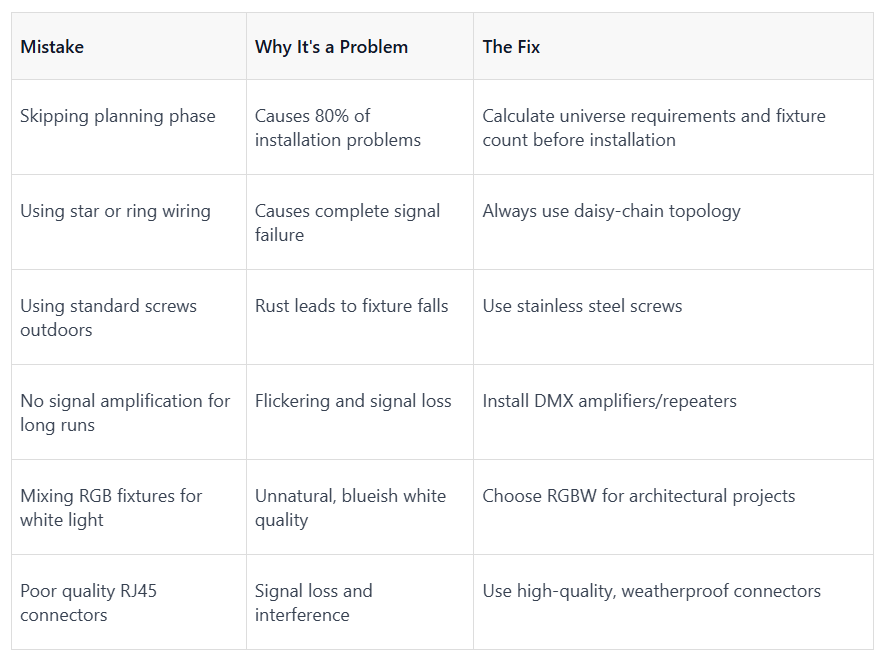
Setting up DMX lighting for a building facade involves four key phases: planning your DMX universe and channel requirements, wiring the system in a daisy-chain topology with proper waterproofing, addressing each fixture correctly, and commissioning the system with signal amplification where needed. The most common mistake is skipping the planning phase, which causes 80% of installation problems . For any professional facade project, use RGBW fixtures over RGB for superior white light quality, and always use stainless steel mounting hardware for outdoor durability.
Phase 1: Planning Your DMX Facade System
Before you install any hardware, you need a clear plan. This is the most critical step — and the one most often skipped.
Step 1: Calculate Your DMX Universe Requirements
The DMX512 standard supports 512 channels per universe. Each fixture consumes a certain number of channels depending on its type .
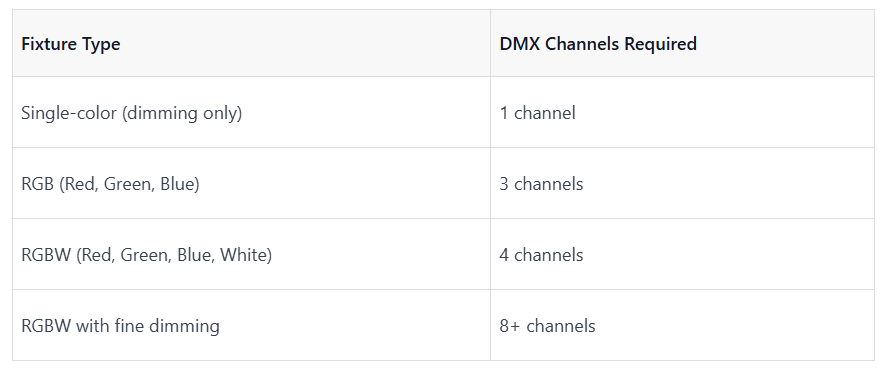
Example calculation :
10 fixtures × 4 channels each (RGBW) = 40 channels total
10 fixtures × 15 channels each (moving head/advanced) = 150 channels total
⚠️ Important: A fixture must stay within its DMX universe — you cannot split a single fixture's channels across two universes .
Step 2: Determine How Many DMX Runs You Need
The DMX wiring standard limits a maximum of approximately 30 fixtures per DMX wiring run . For example:
50 fixtures = minimum 2 DMX wiring runs
100 fixtures = minimum 4 DMX wiring runs
Step 3: Choose RGBW Over RGB for Architectural Facades
This is a critical decision that affects the entire project outcome.
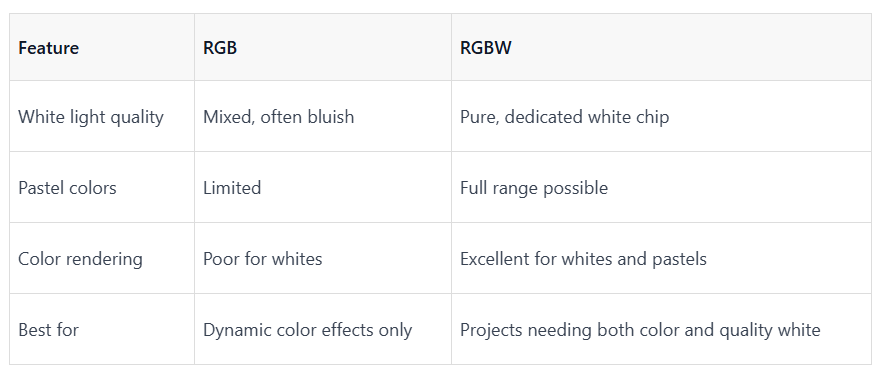
Why this matters: For architectural facades, you will almost certainly want to display white light at some point — whether highlighting the building's natural materials or creating a clean, sophisticated look. RGB's mixed white often looks blueish and unnatural .
💡 Real-world insight: "I have seen clients invest heavily in facade lighting only to be disappointed by the quality of the white light. When you want to highlight the natural stone or color of a building, you need a clean, crisp white. An RGB-mixed white can make beautiful beige stone look cold and sterile" .
Phase 2: Wiring and Physical Installation
Step 1: Use the Correct Topology — Daisy Chain Only
DMX512 requires a daisy-chain connection — a single line, one fixture after another. Do not create a star, ring, or "Y" shape, as this will cause signal failures .
Correct wiring method:

tStep 2: Plan Cable Lengths and Signal Amplification
A good rule of thumb: the DMX control cable should not exceed 300 meters (1,000 feet) from controller to the last luminaire . For longer distances, install DMX signal amplifiers/repeaters .
For outdoor facade projects, the controller can generally be no more than 80 meters from the last light without amplification .
Step 3: Waterproof All Outdoor Connections
Water is the biggest enemy of outdoor DMX installations. Key requirements :
RJ45 connectors: Ensure all 8 pins are correctly crimped. Poor quality connectors are the #1 cause of signal loss in modern DMX projects.
Mounting screws: Always use stainless steel screws for outdoor mounting. Standard screws will rust quickly in outdoor conditions, potentially causing fixtures to fall.
Cable glands: Use proper IP-rated cable glands for all outdoor penetrations.
Step 4: Separate Power and Data
Keep DC power cables and DMX signal cables separated. Running them together can introduce interference and signal degradation .
Phase 3: Addressing and Configuration
Step 1: Set DMX Addresses Correctly
Each fixture needs a unique DMX address. This is the most common source of commissioning errors .
How addresses work:
Fixture 1: Start address = 001
Fixture 2: Start address = 001 + (channels used by Fixture 1)
Fixture 3: Start address = (Fixture 2 start address) + (channels used by Fixture 2)
Example with RGBW fixtures (4 channels each):
Fixture 1: Address 001 (uses channels 001-004)
Fixture 2: Address 005 (uses channels 005-008)
Fixture 3: Address 009 (uses channels 009-012)
Step 2: Addressing Methods
Manual addressing: Setting addresses via DIP switches on each fixture (slower, but common)
Software addressing: Using DMX software or a handheld addressing device
Phase 4: Commissioning and Debugging
Step 1: Power All Fixtures Simultaneously
Professional approach :
Power on the entire system at once
Write all DMX addresses simultaneously via the control system
Send a test signal through the main controller
If the controller shows abnormal feedback, pinpoint the exact problematic channel or fixture
Troubleshoot only the problematic unit
💡 This efficient method saves enormous time compared to testing fixtures one by one on-site.
Step 2: Install Signal Amplifiers for Long Distances
For facade projects, place DMX signal amplifiers (splitters/repeaters) at the end of long cable runs to:
Boost signal strength
Extend control distance far beyond 80 meters
Prevent flickering caused by weak signals
Step 3: Consider Using a DMX Splitter
For facades with multiple rows of lights, a DMX splitter is essential :

Each row receives the same DMX profile, maintaining synchronized effects across the entire facade.
Recommended splitter features for fixed installations:
Optical isolation
Screw terminals
DIN rail mounting
At least 5–6 outputs (one spare)
Common Mistakes to Avoid
Case Study: Movistar Arena Facade
The Movistar Arena in Madrid implemented a new facade lighting system with DMX control, transforming the building envelope into a dynamic visual element. The system combines asymmetric optic LED floodlights with RGBW luminaires, separating base architectural lighting from dynamic scene generation .
Key technical takeaways:
Asymmetric optics improved uniformity and reduced light spill on vertical surfaces
DMX integration simplified scene management and adaptation to different events
RGBW fixtures enabled both clean white architectural lighting and dynamic color scenes
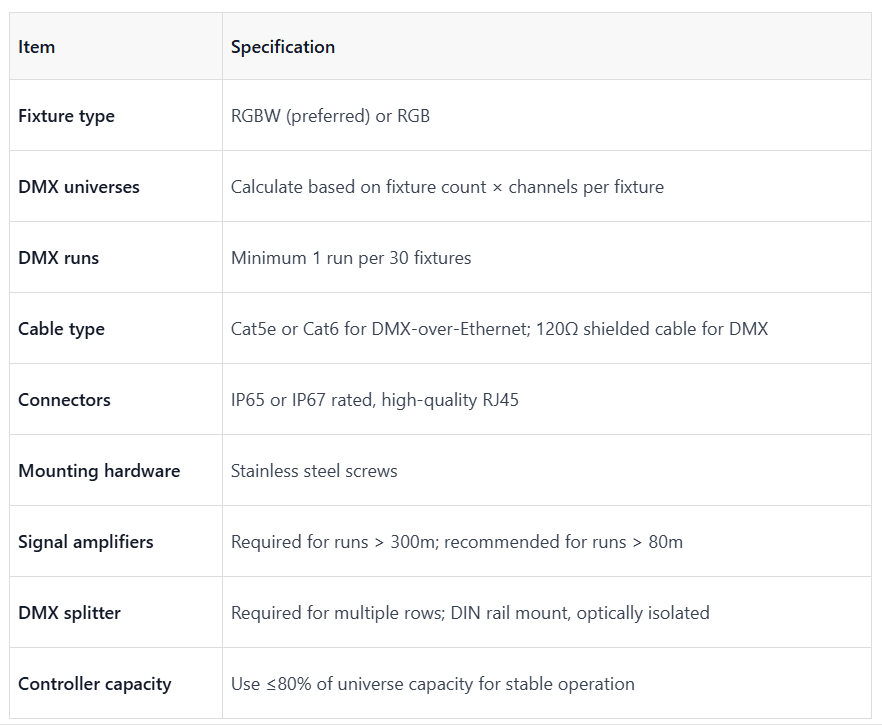
Specification Checklist for Your DMX Facade Project
Related Content
Choosing the Right Control Protocol: DMX512 vs DALI vs 0-10V →
IP65 vs IP67 vs IP68: What Outdoor Facade Lighting Really Needs →
Contact Us
Need help designing or commissioning your DMX facade lighting system? Our engineering team can assist with universe planning, fixture selection, addressing, and commissioning support.